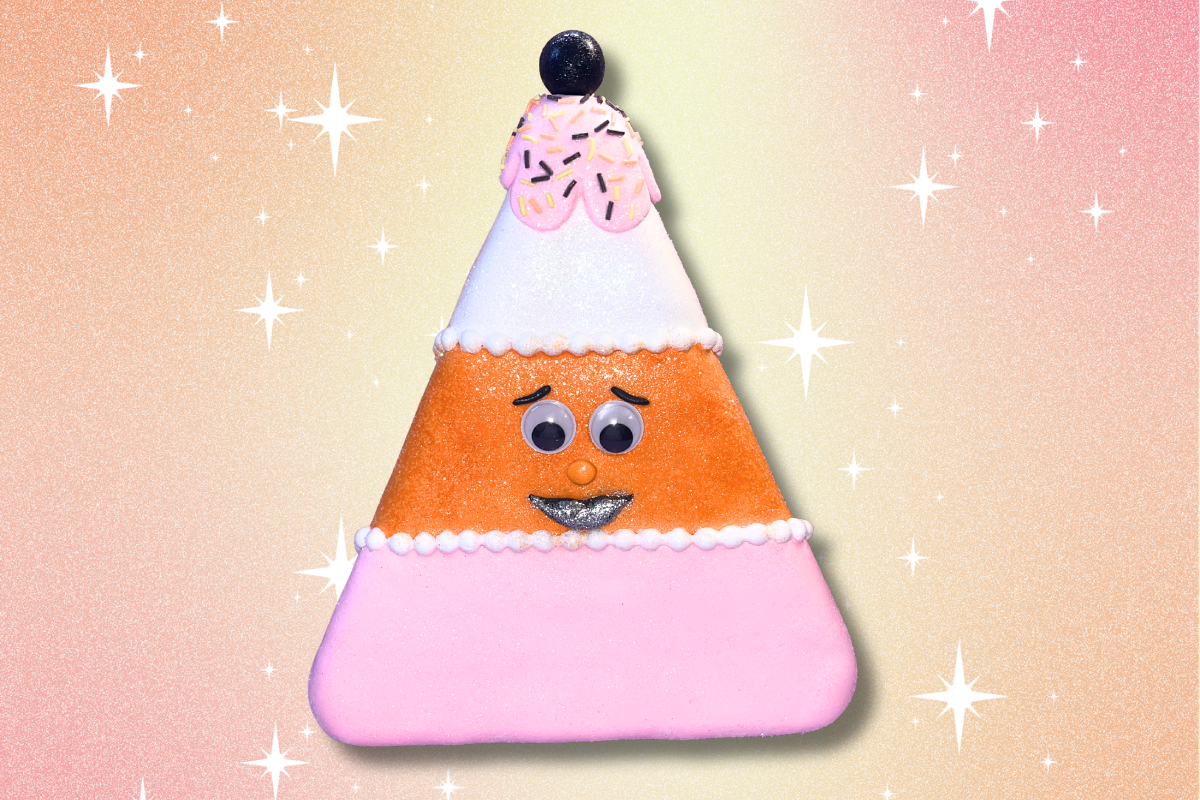
DIY Candy Corn Decoration (Easy Halloween Faux Dessert Craft)
Watch the full tutorial above, then scroll down for the supplies and step-by-step instructions to create a DIY candy corn decoration using air dry foam clay. This cute Halloween faux dessert craft is perfect for tiered trays, seasonal decor, and handmade gifts.
In this tutorial, you’ll learn how to make a DIY candy corn decoration using air dry foam clay and simple molds. This beginner-friendly faux dessert craft is perfect for creating festive fall pieces that look like real sweets.
If you love this project, explore more faux dessert crafts and fake bake ideas for even more cute DIY inspiration. Or you may love checking out this tutorial on how to make Halloween Fake Donuts!
Air dry foam clay is lightweight, easy to shape, and dries without baking, making it perfect for decorative crafts and ornaments.
Why you’ll love this DIY:
- Perfect for Halloween decor and fall displays
- Easy beginner-friendly craft with minimal tools
- Lightweight and ideal for tiered trays or signs
- Customizable colors and embellishments
- Fun faux dessert style without baking
- Great for seasonal crafting and gift ideas
This post may contain affiliate links. If you purchase through these links, I may earn a small commission at no extra cost to you.
Supplies Used In This Craft:
- Air Dry Foam Clay
- Crafting Sprinkles
- Rope Mold
- Flower Cookie Cutter
- Googly Eyes
- Clear Glue
- Fine Glitter
- Styrofoam block (or dense foam like XPS) – available at most craft stores
How to Make a DIY Candy Corn Decoration
- Prepare your workspace and gather all supplies.
- Shape your styrofoam block into a triangle and smooth out all edges.
- Use a marker to divide the triangle into three sections.
- Condition your air dry foam clay until soft and easy to work with.
- Roll out your first section of air dry foam clay and trim it to create clean, straight edges.
- Apply clear glue to the styrofoam, then attach the air dry foam clay starting from the bottom section and working upward (including the sides).
- Repeat this process for the remaining two sections to create the classic candy corn color layers.
- Smooth all air dry foam clay seams and edges using your hands for a clean finish.
- Roll out additional air dry foam clay and cover the back of the triangle using clear glue to secure it. Smooth and connect its edges with the sides.
- Use a rope mold and air dry foam clay to create two decorative strips and place them between each section, securing with glue.
- Roll out more air dry foam clay and cut a decorative piece using a flower cookie cutter.
- Attach the flower shape to the top of the candy corn using clear glue. Make sure the flower shape is flat.
- Add clear glue to the flower shape, and decorate with craft sprinkles.
- Apply a thin layer of glue over the entire design, then sprinkle with fine glitter for sparkle.
- Finish by adding details like Googly eyes, a face, or extra embellishments.
- Let your project dry completely (24–48 hours) before displaying.
Product Highlights From This Video

Googly Eyes
Perfect for adding fun character and personality to your candy corn craft.

Rope Mold
Creates clean decorative borders and textured details.
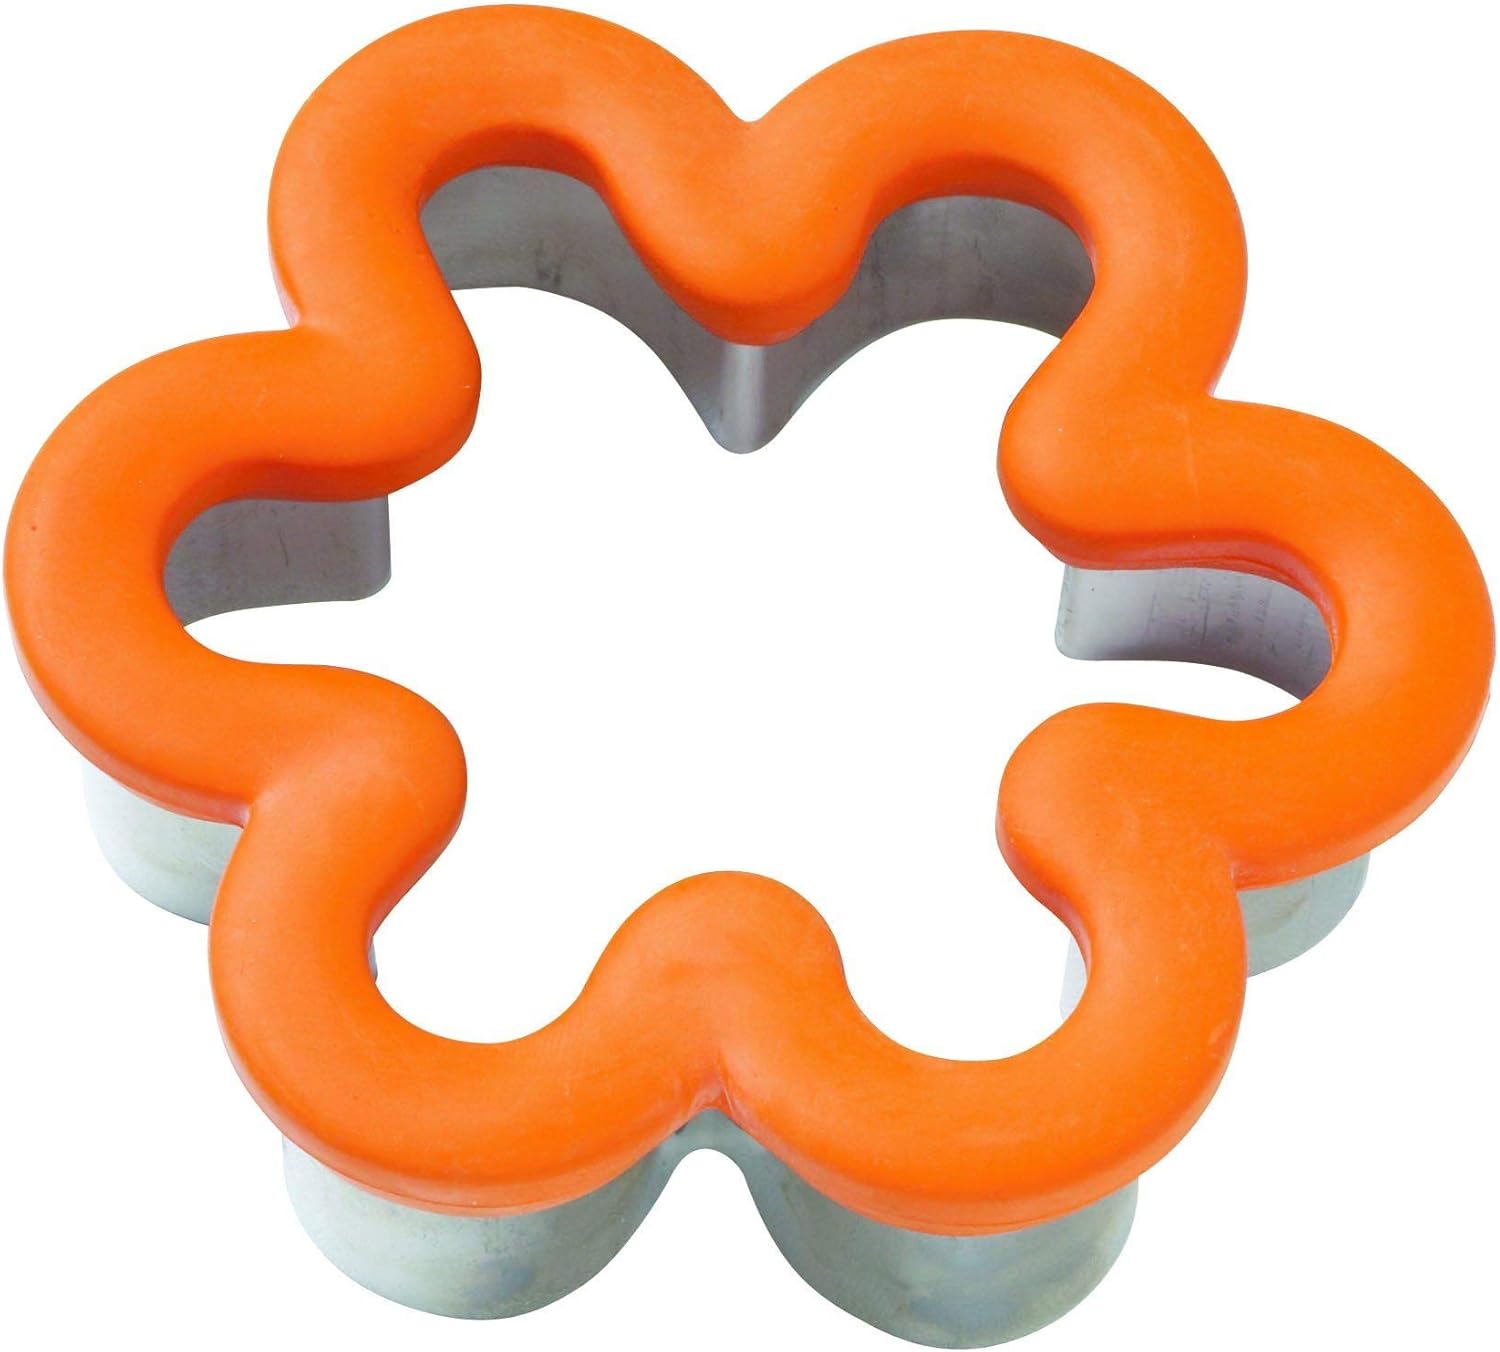
Flower Cookie Cutter
Great for creating cute decorative toppers and accents.
Looking for more supplies I use?
Check out my favorite craft tools and materials here.
Frequently Asked Questions
What kind of foam works best for this project?
A dense foam like extruded polystyrene (XPS) or a firm styrofoam block works best because it holds its shape while applying air dry foam clay. Avoid very lightweight or crumbly foam, as it can dent or break when shaping.
How do I get smooth, even layers on the candy corn?
Roll your clay evenly before applying and work one section at a time. Gently press and smooth with your fingers to remove seams and create clean color transitions.
Do I have to cover the back of the piece?
It’s optional, but recommended if your piece will be visible from all angles. Covering the back gives it a more finished, professional look.
How do I keep the clay from cracking while drying?
Make sure your clay isn’t too thin and avoid overworking it. Applying it in slightly thicker layers and smoothing gently helps prevent cracks as it dries. You can also spray your craft with a finishing spray as well.
What’s the best way to add details like borders and decorations?
Use tools like a rope mold for clean borders, and attach details with a small amount of clear glue to keep everything secure.
How long should I let the decoration dry before using it?
Let your finished piece dry for at least 24–48 hours. Thicker sections may take longer, so be sure it feels fully firm before displaying.
📌 Save This Craft For Later
Pin this cute candy corn craft so you can make it later! 👇